
STEP-BY-STEPS

Separate the top from the rest of the hair with a Sam Villa Signature Series Tail Comb. Starting one inch behind the hairline, create a zigzag part that goes above and below the parietal ridge.
PRO TIP
Ensure that the hair is not soaking wet when you're point cutting. You'll be able to read the hair easier to see how it's going to lay when it’s just a little bit damp & you’ll have great control over your sections.

Stay below the zig zag part. With forward over direction establish the fringe length over the nose.
PRO TIP
To stabilize your shear when cutting, you can use your ring finger to balance the stationary blade of your shear against.

Remain below the zig zag. Separate the right side of the head from the left with a center part down the back of the head. Starting on the right side over direct all sections to the established fringe length. Until you reach the center back of the head. Then repeat on the left side.
PRO TIP
The key to understanding overdirection when cutting is that wherever you're pulling away from you'll be keeping more length there. So, pull away from what you want to maintain.

Drop the top section. From the highest point of the head create eight triangle sections.
PRO TIP
The key to a longer-length shag is a disconnected perimeter. To ensure you don’t cut too deep into the length, isolate the perimeter with Sam Villa Dry Sectioning Clips

Start in the right front triangle. Over direct the triangle section to the highest point of the head. Repeat this step in all the top triangle sections.
PRO TIP
The comb is the tool that can get you in the most trouble. So, make sure you're combing to smooth out any bumps during your cut to ensure precision.
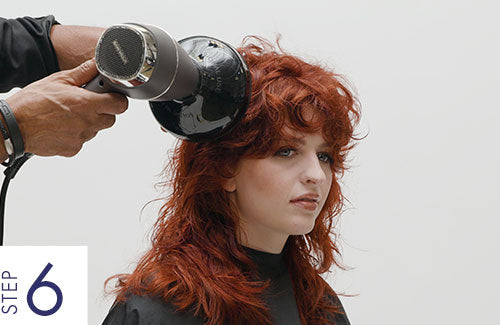
Apply styling product and dry with a Sam Villa Vision Dryer and Deep Bowl diffuser.
PRO TIP
To encourage more movement on the crown you can remove the diffuser from the dryer. Place it on the crown & rotate the diffuser in a circular motion, while still being held right at the scalp. Then reattach the diffuser to the dryer & turn on the dryer on a low heat & low speed to lock in that movement.
TOOLS TO RECREATE THIS LOOK
TOOLS TO RECREATE THIS LOOK
Detailed Process
Cutting - Fringe
1. Begin the cut on damp, not soaking wet hair. Use Redken’s One United as your cutting lotion so you can easily guide through the hair.


Ensure that the hair is not soaking wet when you're point cutting. You'll be able to read the hair easier to see how it's going to lay when it’s just a little bit damp & you’ll have great control over your sections.
2. Section with
the Sam Villa Signature Series Tail Comb. Use the spine of the comb to find the
round of the head & identify the vertical breakdown.
3. Once identified, create a
zigzag
horseshoe
section with the tail comb at the crown for a diffused
line
& clip away with Sam Villa Dry Sectioning Clips.
4. Next create a sub-section in the fringe by creating a small triangle off
a
center part.
5. Take a small
vertical section off the triangle
fringe
section & elevate to a horizontal 90°
at the
center of the face
& point cut
to establish your guideline
using the
Sam Villa Signature Series
Short Cutting Comb & Artist Series Shear in 6.25".
To stabilize your shear when cutting, you can use your ring finger to balance the stationary blade of your shear against.
6. Still working in the fringe work from the center out to the side by taking small vertical slices & overdirecting them to the center & point cut at a horizontal 90°.
Cutting - Shag Layers
1. Next, you’ll want to blend the fringe into the face frame. To do this take diagonal forward sections & overdirect to the center of the face & cut at the horizontal 90°.
The key to understanding overdirection when cutting is that wherever you're pulling away from you'll be keeping more length there. So, pull away from what you want to maintain.
2. Next, you’ll want to continue with the cut with blending the face frame into the layers you plan to establish. Begin this by taking vertical sections until you reach the center back of the head, and overdirect each section to the stationary guide at the center front of the face & point cut at a horizontal 90°.
The key to a longer-length shag is a disconnected perimeter . To ensure you don’t cut too deep into the length, isolate the perimeter with Sam Villa Dry Sectioning Clips.
3. Release the top horseshoe section & subdivide into four (4) quadrants. Then divide the quadrants into two (2) so you'll be left with eight (8) small triangles.
The comb is the tool that can get you in the most trouble. So, make sure you're combing to smooth out any bumps during your cut to ensure precision.
4. Release the front triangles & overdirect to 45° above the horizontal 90° & point cut with a horizontal finger angle with the Sam Villa Artist Series Shear in 6.25”. Continue releasing each triangle section & point cut to the stationary guide you established.
Styling
1. Re-mist the hair if it’s starting to dry out on you. Then use a little bit of Redken's Full Frame 7. Pat it into your hands then apply liberally to the mids & ends. Make sure you have good product distribution. You can use a paddle brush to comb the product through to make this easier.
Mousses are a great, buildable products, so it’s best to start with just a tiny bit then add more if you see fit.
Organically scrunch the hair with your hands to bring out the
natural
movement in the hair.
Then use
the
Sam
Villa Vision Dryer
& the
Deep Bowl Diffuser.
Use the
blow dryer on high heat
& low speed.
2. Have
your client tilt their head
forward, back & side-to-side, slowly,
so you can let the diffuser
do the work & encourage air flow to the root. Try to keep your hands out of the hair while
diffusing to ensure you aren’t causing added frizz.
3. For a soft “S” wave effect,
weave the hair in between your fingers & hold the hair into place
with a bit of tension
& add the
low
heat
& low speed
from
diffuser. Then release the hair &
you'll get a soft
& organic-looking
"S" wave.
To encourage more movement on the crown you can remove the diffuser from the dryer. Place it on the crown & rotate the diffuser in a circular motion, while still being held right at the scalp. Then reattach the diffuser to the dryer & turn on the dryer on a low heat & low speed to lock in that movement.
Finish
1. Spray
Redken's Wax Blast
to finish the look & crinkle or scrunch the hair to enhance texture.
Wax Blast
gives more of a wet finish & enhances texture.
2. Spray
Fashion Work 12
to finish
& really lock the wave pattern into shape.